Article Bread Bag Bloom Craft for Kids
Upcycle empty bread bags into beautiful blooms with this easy STEAM craft for kids!
May 04, 2020
Homemade gifts always hold a special place in our hearts, whether they’re given for Mother’s Day, birthdays, or just because. Our bread bag bloom craft is a touching way for kids to shower Mom with love without having to venture out for supplies. The kids will have fun getting creative with materials you can find around the house, from colourful bread bags to take-out chopsticks. And you’ll love a few hours of peace as the kids concentrate on their art.
Ready to get the kids crafting? Show the step-by-step photos for our our bread bag bloom craft to kids old enough to be trusted alone with scissors. Share this activity with nieces or nephews to make for their moms. Pass it to your partner with a gentle nudge. Or find a moment in the at-home mayhem to make a quiet craft with younger ones. Making our our bread bag bloom craft together means it won’t be the surprise school-made gifts are, but it won’t be any shorter on the love they’ll pour into making something for Mom. Happy Mother’s Day!
Recommended ages:
- 4 – 7 (Supervised)
- 8+ (Unsupervised)
Materials:
- 3 Empty Silver Hills Bakery bread bags (assorted colours)
- Scissors (age-appropriate size and type)
- 2 Elastic bands
- 1 Chopstick (wood or bamboo)
- Green acrylic or tempera paint (any non-toxic kids paint will do, except watercolour)
- Paintbrush
- Cup of water for paintbrushes (optional)
- Vase or mason jar (optional)
Instructions:
How to Make Bread Bag Blooms:
Step-by-step Photos
How to Make Bread Bag Blooms:
Complete Step-by-Step Written Instructions
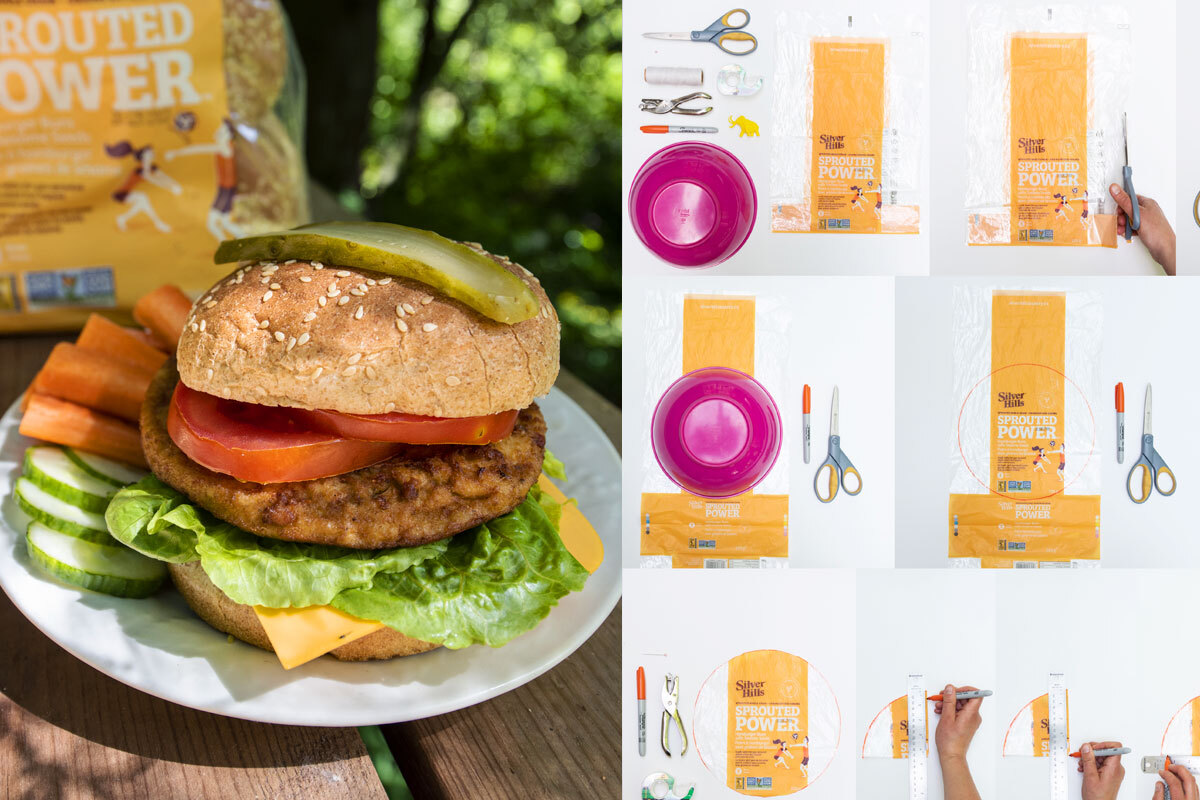
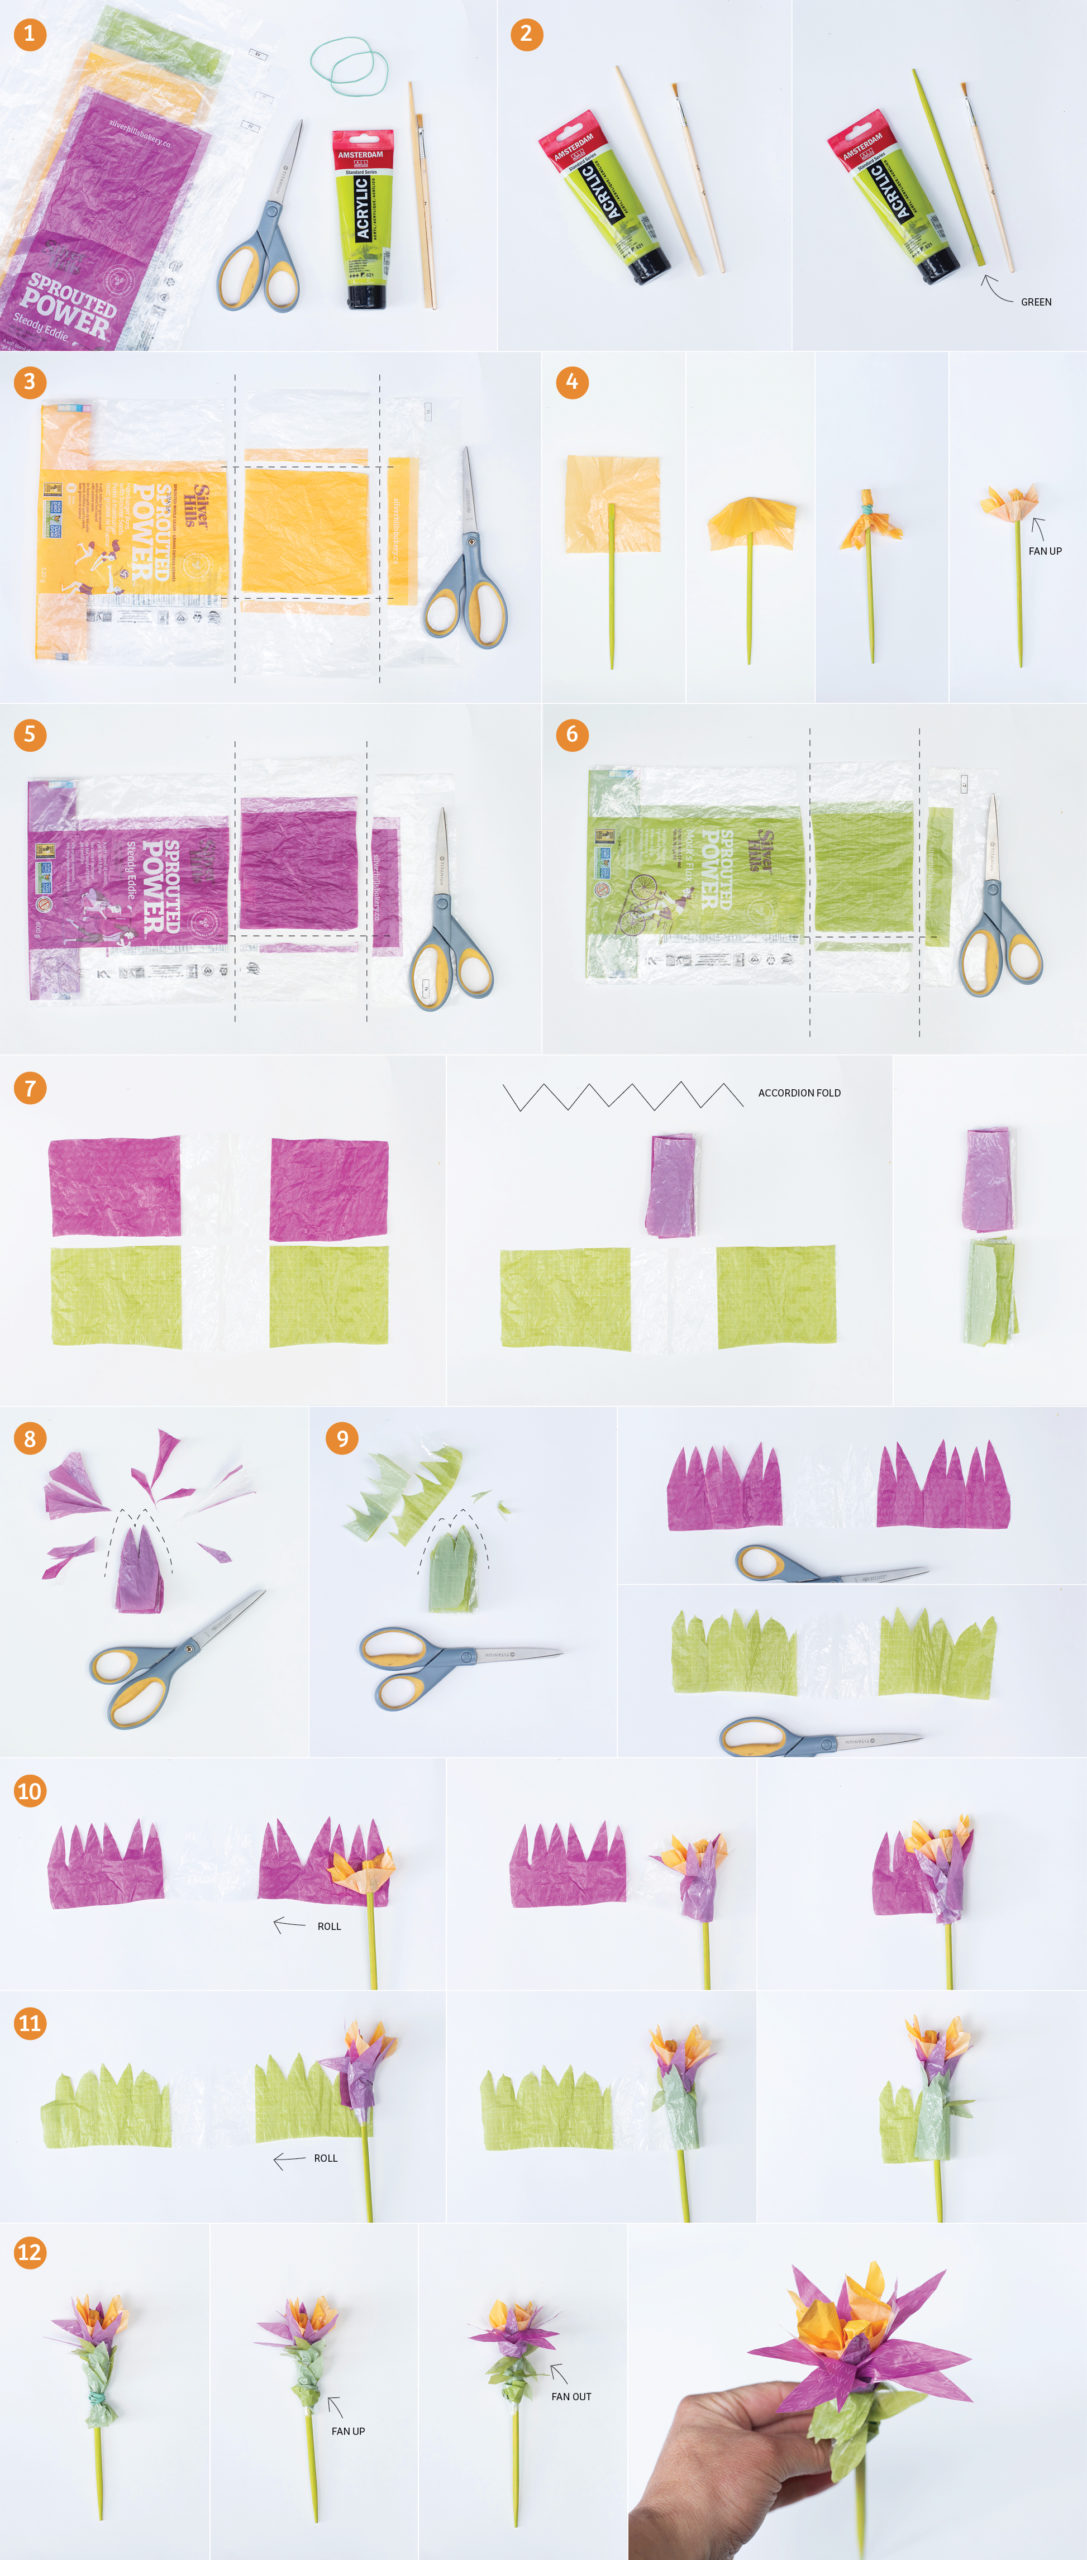
Step 1: Gather Materials and Prepare Your Space
Prepare the space by laying down some newspaper or a paint-proof tablecloth over the area where the kids will be crafting. Depending on their age, we recommend the kids sport aprons or an old shirt in case of any paint splatters. Make sure all craft materials are accessible before getting started. Ready, set, craft!
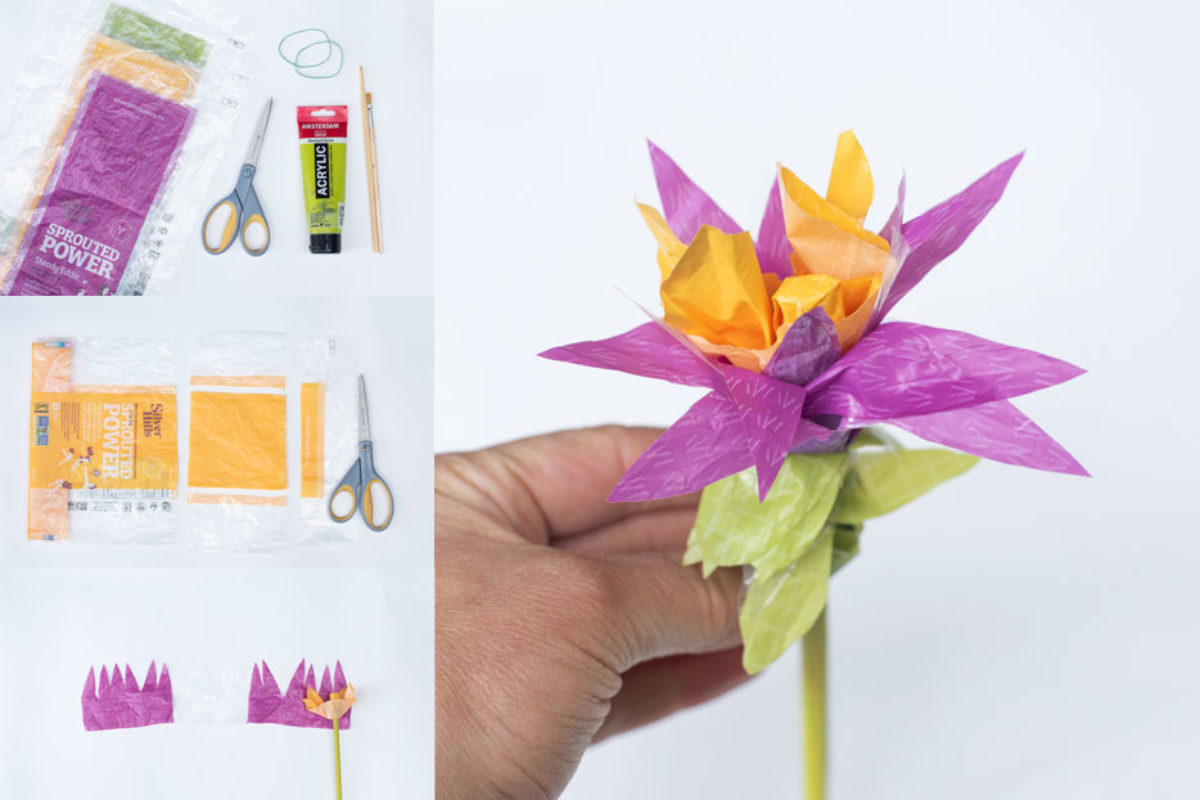
Step 2: Paint the Flower Stem
In Step 2, you’ll need:
- 1 Chopstick (wood or bamboo)
- Green acrylic or tempera paint
- Paintbrush
- Cup of water for paintbrushes (optional)
Transform the chopstick into a flower stem. Secure the chopstick in place by laying it on the working space and pinching the bottom to keep the chopstick from turning over. With your other hand, using vertical, upward motions, paint the part of the chopstick that faces you. When finished, release, and let dry for 5 to 10 minutes (tempera paint dries very quickly; acrylic takes a little longer (use what you’ve got!)). Once dry enough to touch without getting green fingers, turn the chopstick over and repeat on the other side. Let dry. Touch up any spots that you may have missed and set the chopstick aside to dry until the step four.
Wash your brushes, and clean any paint left on your hands and work surface before moving on to Step 3.
Step 3: Cut a Square for the Inner Petal
In Step 3, you’ll need:
- Empty Silver Hills Bakery bread bag (we used the cheerful yellow from our Sprouted Power™ Hamburger Buns with Sesame Seeds)
- Scissors
Using your scissors, cut a square from the top of the bread bag above the Silver Hills logo and below our website address. (Use the dotted lines on the photo for Step 3 as a guide).
Step 4: Attach the Inner Petal to the Stem
In Step 4, you’ll need:
- Inner petal bread bag square from Step 3
- 1 Elastic band
- Painted chopstick stem (dry)
Place the large end of your chopstick in the middle of your square for the inner petal. Wrap the square around the end of the stem, and secure with an elastic band, leaving the bottom half of the square loose. Fan the bag up to create the inner petals of your bread bag bloom. (See the step-by-step photos for Step 4).
Step 5 (And 6): Cut Rectangles for the Outer Petals
In Steps 5 (and 6), you’ll need:
- 2 Empty Silver Hills Bakery bread bags (we used the happy purple from Steady Eddie™ and the fresh green of our Mack’s Flax bread)
- Scissors
Using your scissors, cut a long rectangle from the top of the bread bag above the Silver Hills logo and below our website address. Then cut off the clear portion from one side of the rectangle, leaving one folded side of the bag uncut. (Use the dotted lines on the photo for Steps 5 and 6 as a guide).
Step 7: Fold the Outer Petals
In Step 7, you’ll need:
- 2 Rectangles cut in Steps 5 and 6
Unfold each rectangle you cut in Steps 5 and 6. You should have a long rectangle with coloured printing on each end, and clear plastic in the middle. Fold each rectangle of the plastic accordion-style, starting on one of the short sides. You should end up with several folds and a narrow rectangle. (See the example of the purple bag in the photo for Step 7).
Step 8 (And 9): Cut the Outer Petals
In Steps 8 and 9, you’ll need:
- 2 Accordion-folded rectangles from Step 7
- Scissors
Pinching the middle of the folded pieces to keep the accordion in place, trim the top of the rectangle into a petal shape. Any shape will work! We recommend trimming the top into an M-shape, a semi-circle, or an arrow for the best petal-looking results. (See the photos for Steps 8 and 9 for examples).
Step 10: Assemble the Middle Layer of Outer Petals
In Step 10, you’ll need:
- 1 of the 2 shaped accordion-folded rectangles from Step 8 and 9
- Inner petal and stem from Step 3
Unfold the shaped plastic rectangle you want to use for your middle layer of petals and lay it flat on your workspace. Place the inner petal and stem on one of the short ends of your middle petal plastic (either end works!), with the bottom of the inner petal about a half-inch (1.25 cm) up from the bottom edge of the middle petal layer. (See the photo for Step 10). Roll the middle petal plastic snugly around the inner petal and stem, all the way to the end.
Step 11: Assemble the Outer Layer of Outer Petals
In Step 11, you’ll need:
- Stem with inner petals and middle layer of petals from Step 10.
Unfold the shaped plastic rectangle you want to use for your outer petals, as you did in step 10. Place the stem with inner and middle petals on one of the short ends of your outer petal plastic, with the bottom of the middle petal layer about 1/2-inch (1.25 cm) up from the bottom edge of the outer petal layer. (See the photo for Step 11). Roll the middle petal plastic snugly around the middle petal and stem, all the way to the end.
Step 12: Secure and Fan Your Bread Bag Bloom
In Step 12, you’ll need:
- Stem with all petal layers from Step 11
- 1 Elastic band
With all three plastic pieces rolled around the chopstick, secure in place by wrapping the elastic around the chopstick base of your three layers of petals. Be sure to wrap it far enough up so both the middle and outer petal layers are held in place, about 1-inch (2.5 cm) from the bottom of the outer petal layer. Wind the elastic as many times around the chopstick as needed to hold your bread bag bloom together (this will depend on the width and size of your elastic). Fan up the bottom of the outer petal plastic so it covers the elastic. Then fan the top of the petals out by pulling the cut pieces of plastic away from the chopstick and gently out and down.
Ta-da! Your bread bag bloom craft is complete and ready to gift! Surprise her with one in a bud vase, or repeat the process to create a bouquet. Either way, you’ll brighten her day with a bloom that will never fade.
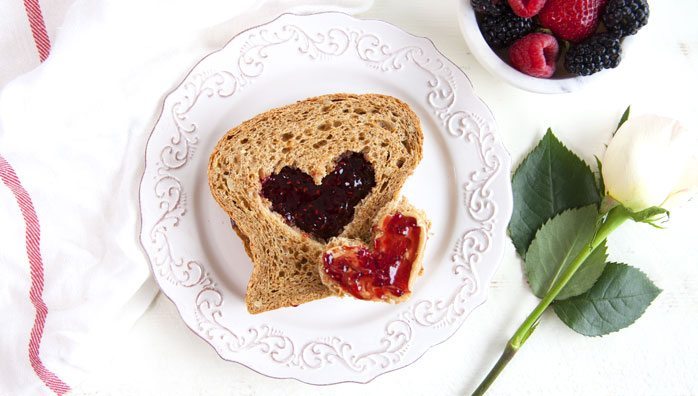
However many bread bag blooms they create, pair them with a breakfast in bed the kids can make all by themselves (or almost!). A toasted slice of her favourite Silver Hills Sprouted Bakery bread, slathered in rose-coloured Raspberry Chia Jam is a deliciously easy option. Simply dump frozen berries, chia, maple syrup, and a splash of vanilla in the blender the day before, and let the kids make some noise with minimal mess. Then kid-made Mother’s Day breakfast in bed is a toaster pop away!
Bread Bag Bloom Crafting Tips:
- If you have a choice, tempera paint is the fastest drying and easiest to remove craft paint for kids. Acrylic paint works just as well, but make sure to allocate 15 – 20 minutes for the chopstick to dry on each side—or bust out the hair dryer on low to speed things along. (Just make sure whatever paper or table covering you’re using is secure before you turn it on!)
- If the kids are making multiple flowers, you can vary the shades of green stems by mixing black or white in with the green to create brighter or darker shades.