Article Sprouting STEM Activity for Kids
November 06, 2020
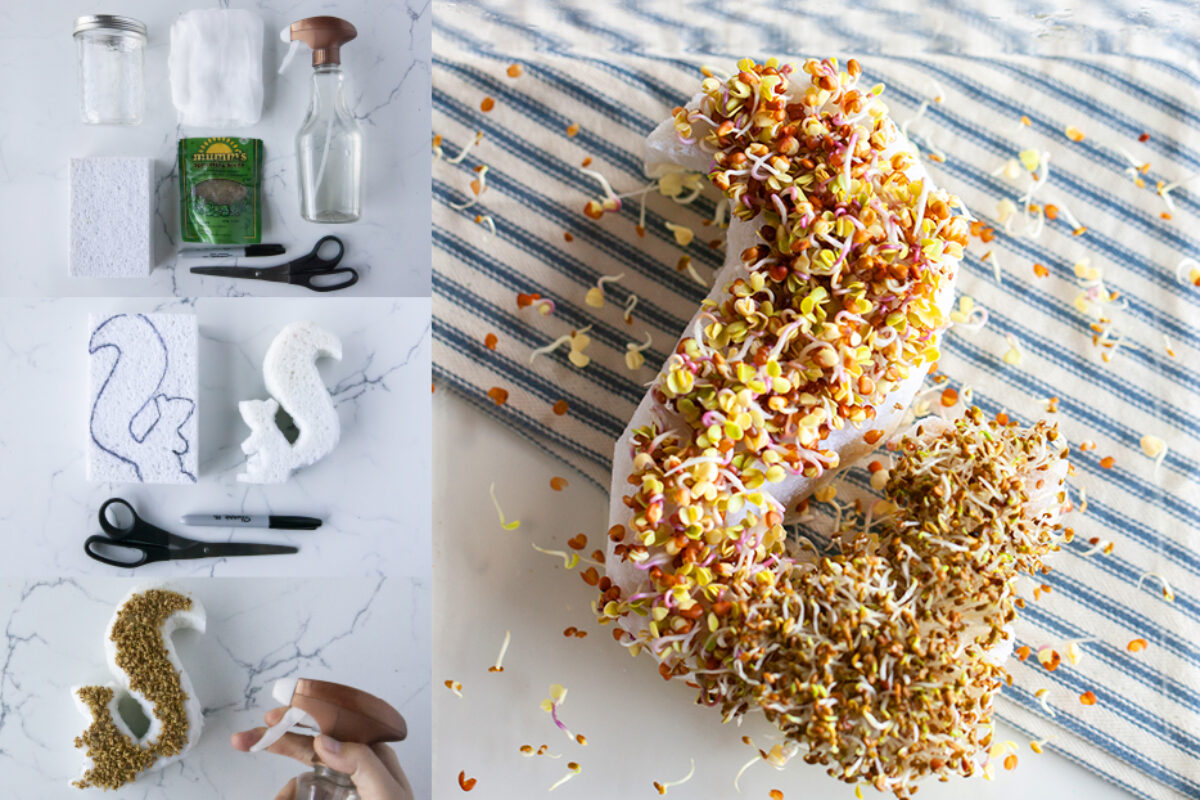
Explore the wonder of the plant lifecycle with this sprouting STEM activity for kids. Faster—and more rewarding—than the classic bean-in-a-cup activity, our grow-your-own-sprouts STEM activity is an edible experiment that’s as simple as it is delicious.
STEM (science, technology, engineering, and math) activities are a wonderful way to spark curiosity and foster strong problem-solving and critical thinking skills. Include an A (for arts) to turn STEM activities into STEAM fun that encourages creative thinking, too.
Half craft, half science experiment, and 100% delicious, our sprouting STEAM activity checks all the boxes for at home STEM activities for kids of all ages!
Children from preschool to second grade will delight in watching their seeds sprout on fun sponge shapes they designed themselves. Kids from Grade 3 to Grade 7 can observe variations in timing, size, shape—and taste—as they explore the sprouting process of different seeds.
Kids will love making, harvesting, and devouring their creations when you invite the wonder of STEM into your kitchen! And the whole family can learn a little more about how sprouting is a nutrition-enhancing and flavour-improving process that makes sandwiches, salads, and recipes even better. (Who knows? Maybe the fun of growing their own sprouts will encourage picky kids to finally eat their greens!)
recommended ages:
- Preschool – Grade 2 (Supervised)
- Grade 3 – Grade 7 (Unsupervised)
materials:
- 1 large cellulose sponge
- 2 – 4 tablespoons small seeds suitable for sprouting, like triton radish and alfalfa
- Shallow, flat-bottomed glass or ceramic baking dish
- Glass jar/s
- Scissors
- Pen
- Spray bottle
- Plastic wrap (or a lid for dish)
- Toothpicks (optional)
instructions:
Sprouting STEM Activity How-to:
Step-by-step Photos
(Find complete written instructions for how to make this easy sprouting STEM activity for kids at home below. Click to read now, or keep scrolling!)
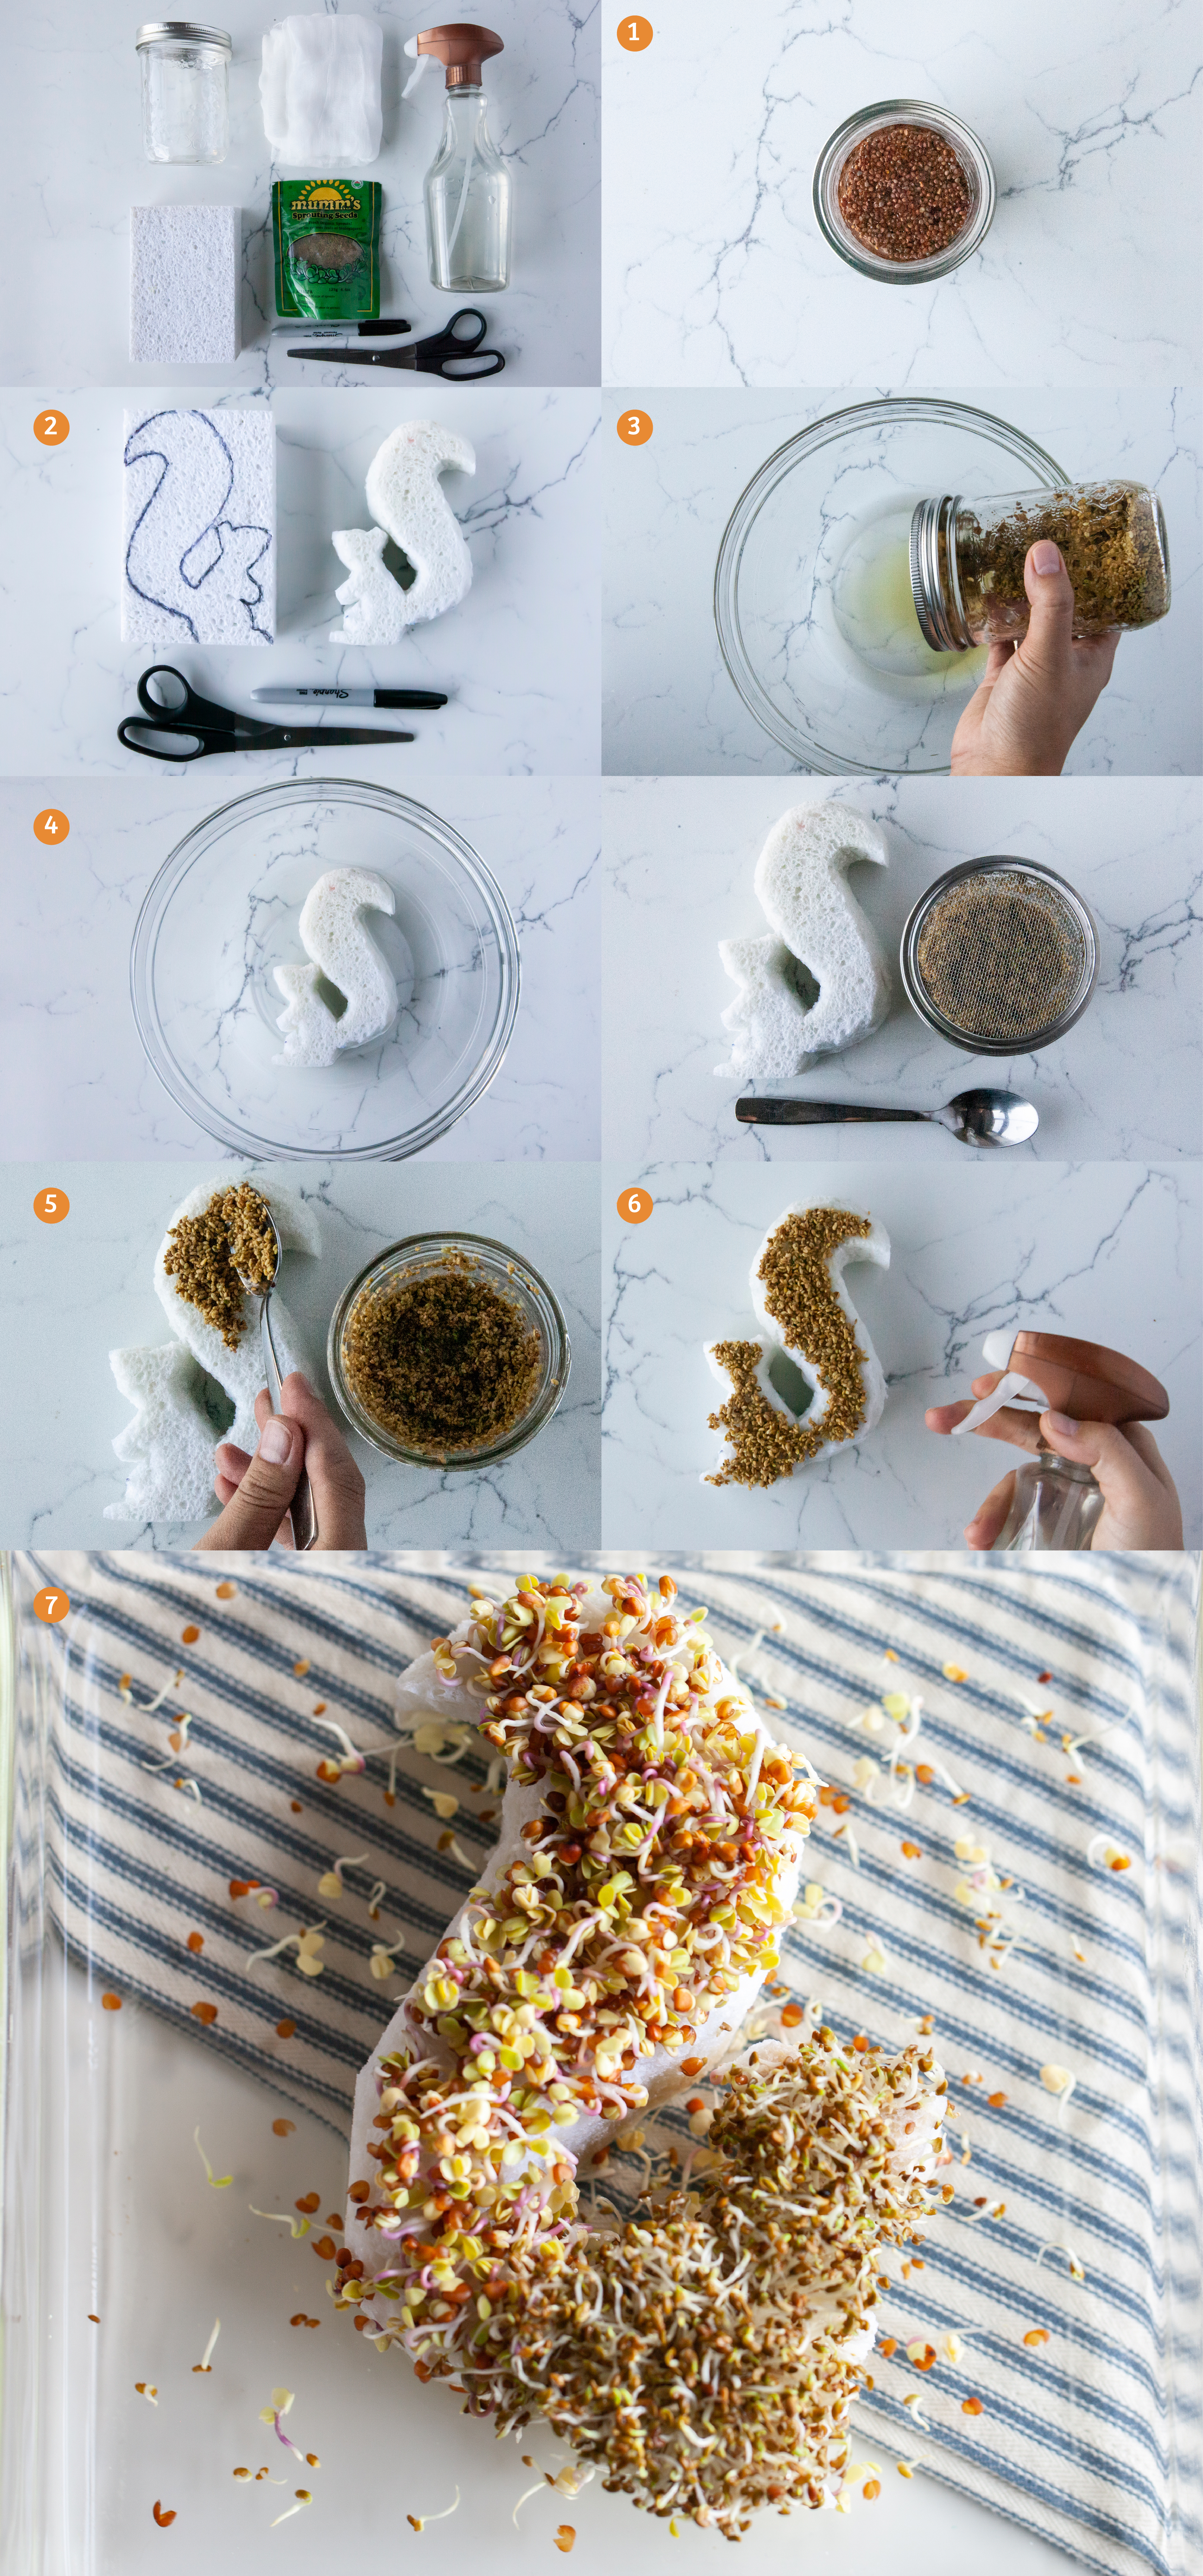
Sprouting STEM Activity How-to:
Complete Step-by-Step Written Instructions
Step 1: Begin by soaking your seeds
Fill a glass jar with cool, clean water, add seeds, and set aside for the recommended soaking time for the seeds you’ve chosen. The triton radish seeds we used on the tail of our sprouted squirrel prefer a 4 – 6 hour soak time.
The alfalfa seeds we used on our squirrel’s body like a 4 – 8 hour soak. (Get soak times for 9 other seeds and grains and a complete Sprouting How-to Guide in Part 3 of our free Why Sprouted Handbook). Experiment with colours and textures by using two or more types of seed. (If you are using more than one like we did, soak each separately).
Step 2: Draw a simple shape directly on your sponge.
Or print out a shape to fit the size of your sponge and cut out a tracer to transfer your design (see below for tips on choosing a shape).
Step 3: Cut out your sponge shape.
We recommend that kids under age 10 have supervision or help cutting their sponge, particularly if the sponge is >1-inch thick.
Step 4: Give your sponge shape a rinse under cool running water.
Squeeze the sponge several times to ensure it’s clean and fully wet. From there, transfer the damp sponge to your flat-bottomed dish and add ½-inch of water (from the bottom of the dish).
Step 5: When your seeds are done soaking, drain them well.
We drained ours with a mesh lid, but you don’t need fancy tools. Use what you have! A mesh kitchen strainer or a square of cheesecloth held in place with a rubber band work just as well!
With a spoon, spread seeds onto the top surface of your sponge in an even layer, no more than one or two seeds deep. If you’re using different types of seeds, spread them onto the sponge in sections or patterns.
Step 6: Time to mist!
Fill your spray bottle with fresh, cool water. Spray seed-covered sponges well, ensuring everything is evenly moist. If your house is warm, cover the dish to keep seed-sponges moist. Mist twice a day with fresh, cool water for the recommended number of days your seeds need to sprout. (The radish and alfalfa seeds we used on our squirrel both take 4 – 5 days to sprout). Don’t forget to top up the water in your dish so your seeds don’t dry out!
Step 7: See your designs and patterns come to life as seeds start to sprout!
Once fully-grown, harvest and eat!
Sprouting STEM Activity Tips:
Sponge cutting and construction:
To make cutting easier, make your shape big enough that the outline comes as close to the edges of your sponge as possible. Avoid complex shapes with internal cut-outs—they’re tough to cut with scissors! (Trust us. We chose a squirrel (because Squirrelly Bread!), but it took adult hands and extra patience to cut out the space between his tail and his back. We learned the hard way so your kids won’t get frustrated when you try this STEM activity at home!)
Instead of cutting out flat shapes, build a structure out of sponge blocks. Cut sponges into basic shapes (squares, rectangles, or triangles). Stack and secure your sponge blocks with toothpicks to build small 3D structures! (Complete Step 4 after cutting blocks and before building your structure, then move on to Step 5).
Sprout watering and growth:
We’ve yet to meet a kid who doesn’t love to squirt things with water given the chance—especially indoors! Make sure every kid gets a turn. Split up morning and evening misting duties, or have everyone tend to their own sponge and seed experiments.
If sprouts start to grow taller than the lid of your dish, use toothpicks to make a tent with plastic wrap. This will give the sprouts more room to grow.
Next-level learning:
Add extra STEM learning for older kids. Have them track the progress of their sprouts and record their observations at each misting. Do some sprouts grow faster or taller than others? Measure changes in size, shape, and colour as their sprouts grow. And don’t forget to observe with other senses, too—the taste test at the end is the best part!
Learn more about the science of sprouting—and get the soaking and sprouting times for 11 seeds, grains, and legumes—in our FREE Why Sprouted Handbook! Sign up to get your copy of Why Sprouted today!
Love our sprouting STEAM activity? Show us your kids’ creations—and share their observations! Use #WhySprouted, tag us @silverhillsbakery on Instagram, or post to our Facebook page.
